Archive for workout tips

How do I Know How Much Weight to Use in the Gym?

How do I Know How Much Weight to Use in the Gym?IMG_0151

This is probably one of the most common questions I get from clients and friends alike. It makes sense, as everyone comes from a do-dietary-supplements-work level of strength and there isn’t really a “guide” that will tell you what weights you should be using. (Side note: Comparing yourself to other people is NOT the way to determine this.)

We are used to looking at a chart to let us know where we fall within a category.

  • If we are a certain height and weight, we should ideally be within a certain body fat range for optimal performance.
  • If we look at our height, weight, and activity level, we can determine approximately how many calories we should be eating on a daily basis.
  • If your heart rate is at a certain level, a chart at the gym will tell you what “zone” you’re in (I have an entire post on this topic coming in the next few weeks as well)

But when it comes to the weight room, no such chart exists. It leaves people doing the same weights with the same rep ranges for YEARS and wondering why they don’t see changes. It is a factor that pushes people to “confuse their muscles” because their current program is “broken”. So let’s break this down once and for all so you can start seeing results in the gym and feel confident that you’re using the correct weights for YOU (remember, everyone is different, ESPECIALLY when it comes to strength).

A Simple Way to Determine What Weights you Should be Using and How to Progress Each Week

1. It’s important to start out by having a plan when you walk into the gym. Whether that is a program that you got from a coach, a plan you printed off from the internet, or just a workout that you or a friend jotted down onto a sticky note, always walk into the gym with an idea of what you’ll be doing.

2. Buy a journal or notebook so that you can track your weights and reps. I know many people that will say “oh it’s ok, I remember all my numbers!”. I’m sure you do….until you don’t and you end up looking like a lost puppy in the gym. Just don’t be stubborn and write your damn workouts down. 🙂

3. Be sure that at the very least, there is a number of sets and a rep range for you to follow. You could also get more technical with predetermined rest periods and tempos, but for simplicity, we’ll leave that out for now.

4. You’ll also want to make sure you can perform the prescribed movement with a full range of motion with bodyweight before you start adding weights. For example, if your workout has you doing back squats for 3 sets of 10,  but you can’t do 1 barbell back squat with a full range of motion, you’d be better off backing down to either a bodyweight squat, box squat, or goblet squat to start.

5. Once you know you can perform each exercise with a full range of motion, you can start to begin adding weight. 

Alright COOL. So you’ve got your handy dandy notebook in one hand, your workout program in another hand, and your coolest workout outfit on (these are the important things people). You’re ready to go!

Using our previous example, your workout program says to do Back Squats for 3 sets of 10 reps. Those are your working sets and typically do not include any warm-up sets. You’ll want to warm up for a few sets prior to starting your working sets (more on that below). Ideally, you’ll also perform some dynamic movements before starting your workout as well.

Someone who knows approximately what weights they’ll be using for their working sets will know when they crossover from warm-up set to working set. Because of this, they will also likely keep their warm up sets shorter (less reps) in order to preserve energy for their working sets. You’ll get to that point in no time, but for now, our warm-up sets will be the same rep range as our working sets so that you can determine what your working sets will be without over/under shooting.

Let’s say you put the barbell on your back (45 lbs) and do 10 reps. It’s no problem and you feel like you could definitely do more, so you rest for a minute or 2 and then add 10lbs on each side (65lbs). You perform a set of 10 reps here and while it’s slightly harder, you still feel that you could go heavier. You add another 10lbs on each side (85lbs) and perform your set. This time, you struggle with the last 2-3 reps. While you could probably go heavier, this is where I’d recommend starting. Remember, you’re not trying to be a hero on Day 1. You’ll have plenty of time to go for PR’s later on, but determining a manageable starting point will set you up for success.

Since you’ve determined that 85 lbs is a good working set for you, you’d perform 2 more sets at 85 lbs and move on to the next exercise.

The next time that back squats are prescribed at 3 sets of 10 reps, you now know that you did 85lbs for 3 sets of 10 last time (because it’s written down in your AWESOME notebook that you’re still carrying around even though you spilled coffee on it this morning, right?!)

This week, you’ll want to try to add slightly more weight. Here’s what you’ll want to do now:

1st Warm up set: 5-7 reps at 45lbs

2nd Warm Up set: 3-5 reps at 65 lbs

3rd Warm Up set: 1-3 reps at 80 lbs

1st Working Set: 90lbs for 10 reps

From here you will decide where to go:

  • If you couldn’t finish all 10 reps at 90lbs, you’d go back down to 85 lbs.
  • If you completed all 10 reps and it was pretty hard (last few reps were a struggle), then you’d stay here for the remaining 2 sets.
  • If this felt pretty easy to you or you felt that you could do more, you may try for 95 lbs on the next set.
  • You can also increase the amount of reps that you did without increasing the weight used. For example, if you couldn’t complete 90lbs for 10 reps, but you could do 85lbs for 12 reps, that is still an increase in what you did the week before.

These strategies can be applied towards virtually any exercise. The big take away here is to try to increase either the amount of weight used or the reps completed each week. I say TRY because it won’t always happen. Some weeks the weight will go up smoothly and other weeks you will easily convince yourself that all of your muscles must have been abducted by aliens. And hey, maybe that is what happens. I’m no xenoarchaeologist.

While there are about 100 different ways you can determine what weights to start with and how to progress in the weight room, this is a very simple way to do it. You can continue to apply these principles each week to your workouts and over time, you’ll get stronger.

Be aware that at some point, the weights won’t go up as easily. Strength is not linear AND has diminishing returns. This means that a new lifter will likely see quick gains in a short period of time. Someone who has been lifting for many years sees much smaller gains over time. This doesn’t mean you’re doing something wrong, it is just how the body works. It’s part of what keeps it fun.

I love to keep in touch with people and am happy to answer any other questions you have. Feel free to leave a comment below OR email me at [email protected]. Even if it’s just to say HEY.

Happy lifting!

-Lizzio


8 Ways to Find Time To Exercise on the BUSIEST Schedule

Good morning people!

Hopefully your day is going well. I’m working away and have a bunch of stuff to do with not much time in between. It got me thinking about busy days and how to find time to get exercise in.

One of the biggest excuses I hear from people about why they don’t exercise is that they just don’t have time. There are very few cases where that is ACTUALLY true. For the most part, there is a way to find time. It just takes some creativity…

o-WAKING-UP-IN-THE-MORNING-facebook

1. Get up an hour earlier. You can get a great workout in as little as 15-20 minutes (I save every workout I do and have hundreds that take just 15-20 min). Getting up an hour earlier will allow you to get an at-home workout in and still shower and get ready for your day.

6a00d834518cc969e2011168959ab2970c

2. Get off Facebook and Social Media. We easily waste at least 30 minutes a day on social media. That time could be used to get a workout in. Less tweeting, more sweating!

20140725-163518-59718285

3. On Kid duty? Involve them in your workout. Take them to a park and play tag, set up an obstacle course for them to do while you’re doing your workout next to them, or use them as your weights. 2 year olds make a really good replacement for a medicine ball. 🙂

10299892_769497676417693_1399043839_a

4. Instead of meeting a friend for coffee, meet them at the gym or at a park and workout together. I would say 75% of the time I’m hanging out with my friends, we meet up for a workout. It gives us a chance to catch up and get our fitness on all at the same time.


5. Schedule it into your day. It is extremely easy to let the day get away from you. If you make an appointment for your workout, it’s much easier to plan your day around it and make sure you get it in. We somehow find ways to get doctor appointments, pedicures, etc. into our day, so we can surely get a workout in if we plan for it. WORKOUT schedule BLANK

6. Plan your workouts for the week based on your busiest days. If you know that Mondays are super crazy for you at work, maybe that isn’t one of the days that you schedule a workout. Schedule them for the days that you’re more likely to be able to stick to that appointment. Don’t set yourself up for failure, make it as easy as possible to stick to your plan.

prep-ten-meals-in-one-afternoon

7. Meal prep on Sunday so that you don’t have to take a lot of time putting together dinners each night (thus creating space in your schedule for a workout). Chop your veggies, cook up some chicken, beef, or other meat. Steam some rice. Prep whatever you’re able to prep in order to make putting your dinners together much easier.

8. Use your lunch break to workout, and bring your lunch to work. Most people get about an hour lunch break. Take 30 minutes of that to workout, and the other 30 minutes to clean up and look presentable to get back to work. I highly suggest getting some Shower Pill body wipes. Game changers I tell ya.

Q’s:

1. What is the biggest obstacle that gets in the way of your workouts?

2. Do you have any other tips for getting your workouts in on a busy schedule?


Navigating Thanksgiving {Tips, Tricks, & Workouts!}

Good morning friends!

Is it just me, or is anyone else already in holiday mode? For some reason this week has been mentally easier for me than most. I think it’s because I know that next week is a holiday, so therefore I’m in the home stretch. Charlie, Oscar and I are heading to AZ to hang with my family for Thanksgiving. I can’t wait!

Thanksgiving is seriously my FAVORITE holiday. The other holidays are great, but for some reason Thanksgiving has always been my favorite. I think it’s a mixture of the food and the tradition. Every year, my aunt puts out an amazing spread. I love food so much!!

While I do love this holiday, I’ve learned over the years that overdoing it doesn’t make me feel good. It always sounds like fun…..until I get finished eating my last cookie and pretty much need to be rolled away from the table. There’s nothing wrong with that at all, but I don’t like feeling that full. It’s uncomfortable.

Because of that, I’ve gathered some great tips and tricks for Thanksgiving that I personally use to help combat the over-eating madness that tends to occur on this day. While I think that Thanksgiving is a perfectly good reason to indulge in all the foods you love, I don’t think it has to be quite the calorie bomb that it can be. With a little planning and thought, it doesn’t have to derail you too much and you can still fully enjoy yourself.

Tips and Tricks to Navigating Thanksgiving:

1. Workout in the morning. This is something I ALWAYS do each year. For some reason, it’s much easier to push yourself really hard and get a great workout in when you know the reward is a huge, delicious meal. Thoughts of pumpkin and pecan pie swirl through my brain as I kick my butt. I try to do something that works my full body and makes me sweat a lot.

Since many gyms are closed on Thanksgiving, here are some suggestions:

Ladder Full Body Tabata Full BodyBurpee Mile_Workout(you can find more workouts like these in my e-book Fit Lizzio Fitness To Go here)

You could also sign up for a local Turkey Trot (find one in your area here) or go for a run or bike ride with a friend/family member.

2. Eat a meal before “the meal”. I used to make the mistake of starving myself all day so that I could scarf down all of the Thanksgiving fixings. The problem with this is that I was SO hungry by the time the food was put out, I’d overeat and not even realize it. (Until I laid on the couch and past out in a food coma). Eat healthy meals leading up to Thanksgiving Dinner. Go with lots of fruits and vegetables (high fiber and filling), lean proteins, and healthy fats. This will help keep your blood sugar levels normal and your appetite in check.

3. Navigate your Plate. Instead of getting a bunch of everything and scarfing it all down, think about the foods you REALLY want and come up with a strategy. For example, I like to fill up my plate with turkey breast meat, green bean casserole, sweet potatoes, and stuffing. Those are my go-to Thanksgiving foods. Since stuffing is my least favorite, and grean bean casserole is my most favorite, I only get a little bit of stuffing and I get a bit more green bean casserole. When it comes to eating, I start with the turkey (lean protein!), and eat a few bites of that first. This is usually the healthiest part of Thanksgiving dinner, so I try to fill up on that before I hit the sides and desserts. Many times, we just need a little taste of each, but if we hit those foods when we first sit down and are starving, our hunger and cravings will usually take over. Try to eat the healthiest foods first and then move on from there.

4. Share your dessert. It’s so easy to eat an entire slice of each kind of pie on the table (pumpkin, pecan, apple, etc!), so if you get one slice of each and share them with a family member, significant other, or friend, this usually helps you to eat less. You can still enjoy all of the flavors and not stuff yourself silly!

5. Freaking Enjoy Yourself!  At the end of the day, it’s just one meal. Don’t fret over it and if you want 2nds or 3rds of the most unhealthy side item on the table, JUST GO FOR IT. I truly believe Thanksgiving should be fully enjoyed. These tips are here to help you make Thanksgiving just a bit lighter, but do what makes you happy on this special day. Remember, one meal won’t derail your efforts (just like one meal won’t make you fit).

Questions of the Day:

Do you have any tips to add that help you to navigate your Thanksgiving table?

What is your favorite Thanksgiving fixing?


Fitness is FUN: How A Bad Trainer Can Make You Think Otherwise

I had an experience the other day that gave me a total “aha!” moment. It was one of those moments where I literally stopped in my tracks and said to myself “oh my gosh…I get it.”

Part of my job as the manager of a high end gym is to ensure that we have highly talented and knowledgeable personal trainers on staff. This is a big deal in any gym, but especially in this area of town and in this gym. Our clientele is mostly fit people that are serious about their fitness. Many have worked with a personal trainer before and will immediately know if someone doesn’t know what they’re doing. As such, part of our interview process involves a 30 minute practical, where the potential personal trainer puts me through a training session, while our Personal Training manager observes. This is helpful because we both get to put our heads together at the end of the training session to talk about what was good vs. what was not good. It’s changed our entire staff for the better and is a really great practice.

Last week, we were interviewing two potential new trainers to hire. We had set up a practical with both of them. One no-showed (well, there’s your answer!), and the other showed up right on time. He was well-groomed, looked the part, and was extremely nice. That’s about all the good I have to say.

We started our training session with some static stretching. I equate static stretching before a workout to the low-fat diets of the 80’s. Irrelevant and not smart. Strike 1.

From there he took me to the Smith machine to do front squats and back squats. Now, knowing my background and my current training, this wasn’t a very bright idea. I have a good working knowledge of front squats and back squats, and this application wasn’t useful, in my opinion.  I use the Smith Machine for the following 3 reasons:

1. Someone is new to squatting and/or very weak

2. Someone has injuries or has other limitations

3. Things I’m unable to do with a standard barbell (certain glute/quad exercises)

(This doesn’t mean other applications are incorrect, but if you’re able to properly do front and back squats using a barbell and plates on your own, no use downgrading to the Smith Machine!)

Smith Machine

Smith Machine

Anyways, I asked this trainer why he was having me do front squats and back squats on the Smith machine rather than using a barbell. Had he given me a decent response to this, I could have accepted it. I am constantly learning new tricks of the trade and was hoping he would have something cool to tell me. But no. The response I got was that it was to “up the intensity.” Really? I can show you 500 ways to “up the intensity” using a barbell. Not a very good answer. Strike 2.

I gave it a shot anyways to give the guy a chance to see what he would have me do. He explained the front squat and back squat and told me to start. The result? It felt awkward. My range of motion was limited. The movement was uncomfortable. I felt the movement in all the wrong places. The experience was not fun. Moreover, the trainer didn’t help me get into the proper position, he didn’t make sure my form was proper, he just stood by and told me what to do. (There’s always a chance my form wasn’t right, making the movement feel awkward. After all, I don’t use the Smith Machine for squats. Ever.)

It was then that I had this realization. I am someone who LOVES working out. I love to sweat and work hard in the gym. For the most part, you can put me in any situation at the gym, and I’m game! Not everyone feels this way, and that is perfectly okay.

But had this been my first time in the gym and that been my first time with a personal trainer???? I would have walked out that door and never come back. I would have thought working out was not fun, uncomfortable, and didn’t feel good. I would have thought “well, that’s not worth it!”

I wonder how many times that has happened to someone who claims they “hate working out”…..when really they just haven’t had a good experience? I’m sure it’s very common and that bums me out!

With that said, I challenge all of you that have tried working out and deemed it as something you hate, to try again. Try something new, try something that look fun to you. Working out does not have to be barbells in a gym. The whole point is to do something that makes you feel good, requires your body to work hard, empowers you, makes you strong, and makes you sweat it out! For some, that might be rock climbing, for others, that’s lifting weights, for the next person, it’s taking an adult gymnastics class. DO WHAT YOU LIKE. And if you have a shitty experience either on your own or with a trainer? TRY AGAIN.

Fitness should be FUN, and inevitably will make you feel like you’re on top of the world. You can’t buy that feeling! I promise, there is something for EVERYONE.

1. What new fitness adventures have you been on lately?

2. Have you ever worked with a trainer that made you think fitness sucked?

Valentine’s Day Partner Workout

Happy Valentine’s Day!! Whether you’re celebrating big or hating on the holiday, just enjoy some time with your partner, friend, relative, or pet!

Hearts-in-Unity-Logo-LG

In the spirit of Valentine’s Day, I put together a partner workout that you can do with any of the above people (although your dog might just make you do all the work!).

Sweat it out with someone you love today!

Valentine’s Day Partner Workout

(This is best done at a park or somewhere that you will have a little bit of room)

Warm Up: Between the two of you, complete 100 squats. You can break it up however you’d like, but you can’t both squat at the same time!

#1. Fast Jacks

Partner 1: 50 Jumping Jacks

Partner 2: Push Ups until Partner 1 finishes

Switch roles and then repeat!

#2. Burpee Challenge!!

Partner 1 does 1 burpee, Partner 2 does 1 burpee, Partner 1 does 2 burpees, Partner 2 does 2 burpees….

Keep going up the ladder until someone can’t finish a set!

Pro Tip: I highly suggest making a bet for this one…massage for the winner?! 😀

#3. Run it Out!

Find about a 15-20 yard space and mark it.

Partner 1: Sprint to the marker and do: 5 push ups, 10 squats, 10 sit ups, sprint back and tag Partner 2 to do the same thing.

Complete 5 rounds of this!!!

Happy Sweaty Valentine’s Day!!!

sweaty workout

Question of the day:

Are you a lover or hater of the holiday?

I’m indifferent. I like spending time with my man, but hanging out at home with a movie is fine by me.

HIIT It!

It’s only Tuesday?! Monday was crazzzzzzy. I feel like I say that every day actually, but it’s true! I wear many, many hats and sometimes I start losing my mind. 😀

This cracked me up!

This cracked me up!

Yesterday I hit up the gym for some HIIT action before my climbing action. I had a few questions as to what I do for HIIT. Maybe you’re even wondering, “Lizzy, why do you keep talking about beating people up?!”. Let me dispel….

HIIT is short for High Intensity Interval Training. It sounds just like it is. The intensity is high, and you’re doing intervals. (Thank you Captain Obvious)

The idea behind it is that you are working at 90-100% for, say, a minute or two, and then giving yourself ample rest (walking, jogging, doing nothing for another minute or two before doing it all over again…and again…and againandagainandagain.

Here are some of the reasons I love HIIT:

1. It is anaerobic, which means that your fast-twitch muscles are recruited, engaging strength and speed. I could get extremely technical on this, but I’ll let you do some googling if you’re really curious (or feel free to e-mail me fitlizzio (at) gmail (dot) com). Your body response with anaerobic work is different than that of aerobic work (such as jogging, walking, etc.). In addition, the “after-burn” as they call it can last up to 8 hours after exercises (sometimes more or less depending on how hard your body worked). This means that your metabolic rate (calorie burning furnace that lives inside your body) will be higher long after your workout finishes.

2. My favorite: It’s quick! While it can be much tougher than just jogging steadily for 30 minutes, it is done in about half the time. You can pick and choose how long you want to do it, but if it’s more than 20 minutes, odds are you aren’t working hard enough during your “working” intervals.

3. It makes me feel strong and keeps me focused. While a nice jog makes me feel refreshed, a hard HIIT session makes me feel like a badass. I like feeling like a badass 🙂

The beauty of HIIT is that it is different for everyone. My “working” interval may be your rest interval and vice versa. The point is to work to YOUR potential, not mine or anyone else’s.

Here’s a HIIT workout I’ve been doing before my workouts a few days per week. This can be done on a treadmill, or outside. It can be done on a bicycle, elliptical machine, or swimming laps too. The point is simple: Work hard for 1-2 minutes, rest 1-2 minutes, and repeat until you’ve completed about 15-20 minutes.

HIIT IT AND QUIT IT (:-o)

Minutes 0-2: Jog at a leisurely pace (for me, this is 6.5-7.0 mph)

Minutes 2-3: Sprint! 90-100% intensity..go go go!!

Minutes 3-4: Either jog or walk, depending on what you want to do. I like to jog for my “rest” intervals, but walking is completely acceptable. It’s your REST so rest as you see fit.

Repeat minutes 2-4 five more times

This workout will be done in 15 minutes, and if you’re truthfully working to your full potential, I guarantee you will be a sweaty mess by the end!

Happy HIITing!

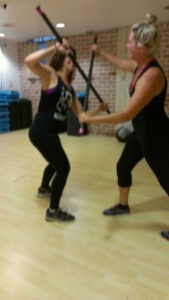
Okay, not this kind of hitting...

Okay, not this kind of hitting…

Do you prefer HIIT or steady-state cardio?

Proper Squat Form

Happy Monday! I thought I’d start this fabulous week off by talking about our booty’s best friend: the squat. 

(Please note, I am not a doctor and this is not a prescription. Please check with your doctor before making any exercise changes or trying anything new if you’re not comfortable with it.) 

I love squats for SOOOO many reasons: 

1. They are a GREAT exercise for the legs, butt, and core. 

2. They are something you can do anywhere.

3. They help build the booty and keep it perky!

4. The squat is a practical movement. By this, I mean that it is used in our everyday lives. A non-practical movement? The tricep-kickback. Tell me when you do that in daily life…

5. Versatility! They can be used as an isometric movement (static squat), a heavy movement (heavy barbell squats), a plyometric (jump squats), and more!

I created a quick video of me squatting so that you can see what proper form looks like. Of course, it can take practice and patience, so keep working on it if you’re not there yet!

My three tips for performing a proper squat are: 

1. Sit back first. Many people start to bend at the knees first, but this puts you in the position to squat with your knees bending past your toes and your weight to be put in your toes, rather than your heels. Sit back and THEN drop down. This will keep your weight in your heels, utilizing your glutes and hamstrings more. 

2. Squat Down with your chest up. A good way to practice this is to wear a shirt with a logo on the chest and face a mirror while doing the movement. You should be able to see that logo in the same position for the entire movement. 

3. Push through your heels. When you get to the bottom of your squat (which ideally will be butt below the knees, or as we like to call it “ass to grass”) you medizin-de have to come back up! Push through your heels in order to promote the body to stay in it’s upright form and not put your weight back into your knees. 

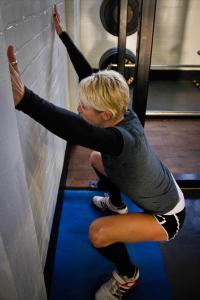
I hope these tips help you to perform your best squat yet! Start with just body weight and move up to weights as you begin to get more comfortable with the movement. You can also practice Wall Squats to train your body to keep your chest upright during the movement. (Start as close to the wall as possible in order for you to perform the squat. Do 3 sets of 15 reps 3-4 times per week, working towards moving closer and closer to the wall). 

Wall Squat

Wall Squat

Happy squatting everyone!

Questions for the day:

1. What is your favorite exercise?

Mine is the deadlift, but squats are a close 2nd.

2. Did you watch the Superbowl?

Let’s put it this way, I fell asleep in the 4th quarter. No joke.