
I wrote this blog for IRON Fitness, but I liked it so much that I asked if I could share it here too. As you all know, hip thrusts are one of my favorite exercises. I’ve now been hip thrusting for 10 years thanks to BC (The Glute Guy) introducing me to them. The full blog post is below:
This blog is all about the popular glute exercise, the hip thrust!
For some of you, you’ve probably walked by the Hip Thruster in the gym a hundred times and wondered why the powers that be decided to put Santa’s sleigh in the middle of the gym.
For some of you, you’ve seen the Hip Thruster being used and either thought “what does that even do?!” OR you wanted to try it, but you weren’t sure how.
And for some of you, you’ve used and love the Hip Thruster.
No matter which category you fall under, this blog post is going to benefit you (and your glutes) in a lot of ways! (7, to be exact).
First thing’s first: What IS the Hip Thruster?
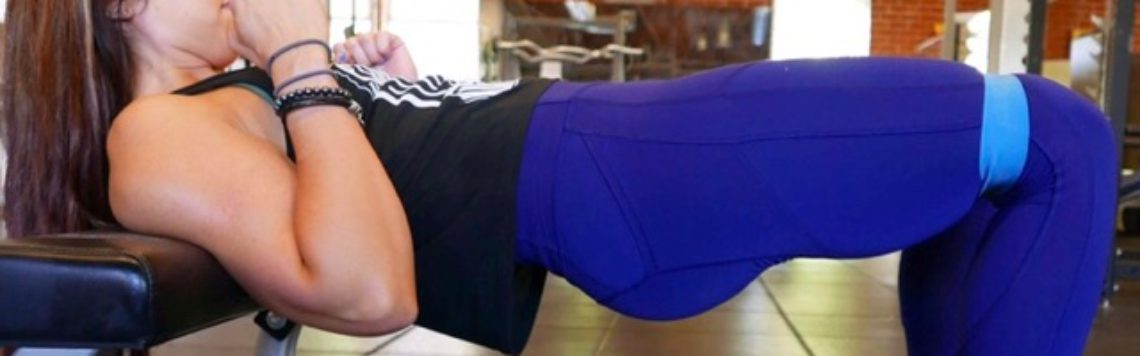
The Hip Thruster is a piece of equipment developed by Dr. Bret Contreras that allows you to perform glute bridges (a.k.a hip extensions) in the most optimal way in order to train, strengthen, build, and condition your glutes. Strong glutes are important for sport’s performance (like sprinting and jumping), general back health (weak glutes are a leading cause of back pain), and the reason the majority of people do them: to have a nice, round backside.
The Hip Thruster’s design allows you to elevate your upper back, plant your feet without slipping, and provides the proper bench height to ensure that you’re able to extend into the ideal position for glute contraction. Typical benches in the gym are too high and if they’re not bolted into the floor, are very prone to moving during this exercise. Since we’re all built a little differently (short, tall, long legs, short legs, long torso, etc) there are times when an intervention (such as an airex pad) may be used to allow you to get into the proper position on the Hip Thruster. For most people, the height of the Hip Thruster is perfect.
Before I show you these 7 Hip Thrust variations, let’s talk about the basics.

- Situate your upper back on the pad of the Hip Thruster so that it is just underneath your shoulder blades.
- Keep your arms at your sides and make fists, or if you’re using a dumbbell or barbell, hold onto the weight.
- Your feet should be out in front of you at a distance that yields a 90 degree angle of your knees when you’re at full extension.
- Keep your chin tucked and ribs down. Find a spot in front of you and keep your gaze at that spot throughout the entire movement.
- Foot placements varies person to person. Here are some starting points, but over time, you’ll find the best foot placement for you that gives you the greatest glute contraction.
- Feet shoulder-width apart, facing straight forward
- Feet 2-3 inches apart, facing straight forward, with knees out.
- Feet wider than shoulder-width, toes slightly flared out.
- If you feel your quadriceps (top of your thighs) taking on a lot of the work, try playing with your foot placement. You can also place a small resistance band around your knees. This forces you to push your knees out against resistance, which will engage your glutes.
Ultimately, hip thrust form has some absolutes, but is a very individual exercise in many ways, so you’ll have to experiment to find what feels best for you. (Psst. We can help you with that, especially in our BRAND NEW Just GLUTES Small Group Training Sessions).
How to Perform the Hip Thrust:
Now that you know your setup, here’s how to perform the movement. The movement is the same for all variations, with only slight differences that I’ll discuss below.
Once you’ve set your back on the bench just underneath your shoulder blades, chin is tucked, ribs are down, and foot placement is set to your liking, drive through your heels, SQUEEZING your glutes as you come up until you hit full hip extension. At the top of the movement, your torso should be flat, knees at a 90 degree angle, and a good contraction in your glutes! With your chin tucked and ribs down, you’ll prevent yourself from being able to overextend, which can cause back pain. From here, you’ll lower back down and repeat.
Without further ado, here are 7 Ways to Perform Hip Thrusts:
Bodyweight
These are done just as described above. Beginners should start by doing 3 sets of 15 reps with pristine form. Once you’ve mastered that, you can begin adding weight, resistance bands, additional reps or tempo adjustments.
Dumbbell


To perform the dumbbell hip thrust, place the dumbbell on your hips. It will feel tight at the bottom of the movement, but that’s normal. As you extend your hips at the top, roll the dumbbell slightly forward to move it off of your hip bones. This is just to eliminate any irritation from the dumbbell being directly on top of your hip bone.
Barbell


To perform the barbell hip thrust, I suggest placing bumper plates on each side of you. You’ll also want to use the Squat Sponge (or another barbell pad) to protect your hips. Roll the barbell up onto the bumper plates and over your hips. Set up in your start position and then begin. You can perform these in a heavy rep range (1-5 reps), medium rep range (6-12 reps), or high rep range (13-25). It is best to practice all rep ranges, but depending on your goal, some rep ranges are better than others. Heavy rep ranges are best for strength, medium rep ranges are best for hypertrophy, and high rep ranges are best for conditioning and endurance. All three rep ranges can and will yield hypertrophy (muscle growth), but depending on the person, the rate at which this happens may vary.
Hip Banded


The Hip Thruster has pegs on either side to allow for an easy placement of a resistance band. Cross the resistance band over your hips, making sure it is securely wrapped around the pegs. For this variation, you want to have constant tension (meaning there is not resting position) throughout the entire movement. To do this, your starting position will be slightly higher as you find the point where the resistance starts. Once you find it, that becomes your starting point. Perform these reps in a shortened range of motion by going from your starting point to full hip extension. You can perform these as fast reps (do them as quickly as you can), at a normal rep pace, or by doing pause reps (details below).
Knee Banded


To perform this variation, place a small resistance band either just below or just above your knees (personal preference, but i prefer above the knees). You still want to keep your knees out, so having the resistance forces you into hip abduction, which will increase the glute activation. (In other words, it makes it harder and burns more.)
Pause Reps
Pause reps can be performed with any of the above or below mentioned hip thrust variations. To do these, you’ll pause at the top of the hip thrust and hold for any given amount of time. I recommend trying 3 second holds at the top of each rep for 8-10 reps. When that becomes easy, you can either increase the weight or increase the pause time to 5 seconds per rep. I also like to do a single pause rep at the end of any hip thrust variation that may last anywhere from 3-15 seconds.
Combos
The beauty of the hip thrust is that you can combine any of the aforementioned versions of this exercise and change the difficulty, feel, and muscle recruitment. Some of my favorites include:
- -Dumbbell + Hip Band
- -Barbell + Knee Band
- -Hip Band + Knee Band
As you find your form and become stronger, you can play around with these combinations as well as tempo changes (pause reps, fast reps, super slow reps, etc.) and see what you like best.
Take-Aways & Things to Keep in Mind
The big thing I tell my clients is that you have to figure out what you like best and what you feel most. For some people, heavy hip thrusts are the hardest variation. For others, high rep-hip banded hip thrusts are hardest. Personally, the Dumbbell + Hip Banded + Pause Rep hip thrusts are the biggest bang for my buck. With that said, I perform all variations of hip thrusts and at various rep ranges and tempos. This ensures that I am working my glutes in more than one way in order to get the best results.
As you can see, the Hip Thruster gives you the ability to really increase the intensity of your glute training. Whether you’re training for a sport (and yes endurance athletes, this exercise will improve your performance too!) or you just want to turn heads when you pull off your swimsuit cover up at the beach, the hip thrust is hands-down the best glute training exercise out there. It’s not the ONLY one and it’s important to train in different planes of motion, it definitely gives you a great return on your exercise-choice investment.

